Microsoft SQL Server Express Installation and Setup
Note: The SQL Server will improve your Loadman Fleet Manager's
performance if any of the following apply to you.
Otherwise it is not required nor advised to perform this upgrade.
- You need to access the database over a slow data link such as older networks
or a wide area network.
- You will have 4 or more users attached to the database at one time.
Note: The files to be downloaded downloads are approximately 100
megabytes and will require approximately 600 megabytes of disk space
when installed.
Note: The database server can be on a computer that will run the Loadman Fleet Manager
or a separate database computer.
Note: This installation must be performed by a user with Administrator
authorization.
Note: Please check the
SQL Server Express 2008 minimum requirements or the
SQL Server Express 2012 minimum requirements
to verify that you are ready to install the database server.
To install and set up SQL Server Express go to
LoadmanSoftware.com
and select Loadman Fleet Manager Released Software.
You will be provided the login and password.
You can choose to either install SQL Server manually by downloading
and installing the components separately and going through the
installation wizard, or you can install SQL Server automatically by
downloading and installing the single-file option. If you want
to do a manual installation, skip to the Manual Installation
section below.
The single-file option installs asks a couple of questions and then installs
SQL Server without you having to go through the installation wizard. The questions
asked by the single-file installer is whether to install SQL Server with Windows
Authentication or SQL Server Authentication.
Windows Authentication requires that the Windows account name of everyone that
runs Load Manager either on the master or the satellites be configured as
authenticated users on the SQL database. For instance, if you have two
operators named Fred and Sally that individually log on to the same computer
to run Load Manager, the Windows account names for both would have to be configured
in the database as authenticated users. If another operator is added later, that
operator’s Windows account name would need to be configured in the database. The
same thing would be required for everyone logging in to Windows to run Load Manager
on any computer. SQL Server would use the Windows account names to verify with the
domain controller that those named persons were allowed to connect to the database.
If you want to use Windows Authentication, check the Just install SQL Server and
don't create a user account button in the dialog shown below.
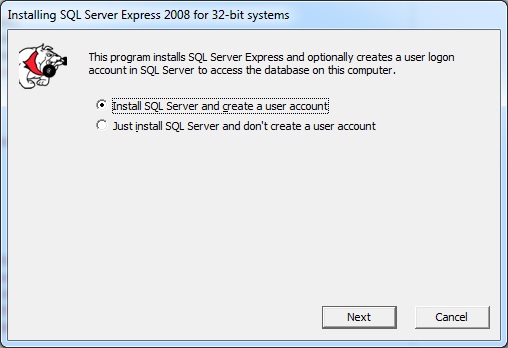
SQL Authentication can be easier. The Loadman installer wrapper that installs SQL
Server and clients can create a SQL login and store that information on a computer
and Load Manager can use that stored SQL login to connect to the database.
That means that any operator logged into a computer configured that way would
be able to run Load Manager without having to specifically add them to the
authenticated users list. If you want to use SQL Server Authentication, check the
Install SQL Server and create a user account button in the dialog shown above.
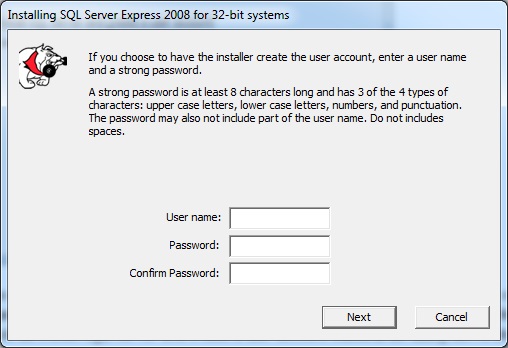
Then, enter a user name and password into the dialog shown below. The password must
contain at least 3 of the 4 types of characters: upper case, lower case, numbers, and
punctuation. Record the user name and password because you will enter them when you
install the SQL Client software on satellite computers.
SQL Server will be installed and automatically configured for you.
SQL Server Manual Installation
Download or click the link to the appropriate version of the SQL Server and
the SQL Server Management Studio for your system (there are further
instructions on the download page to help you select the right version).
Then follow the instructions for SQL Server 2008 or 2012 below as appropriate.
SQL Server Express 2008 Install
- Log on to your computer with an Admin account.
- From the LoadmanSoftware.com Release page get and run the file
SQL_ManagementStudio_2008xXX (where XX is 32 or 64 depending
whether you need the 32 or 64 bit SQL Server).
- You will be presented with the SQL Server Installation Center.
Select Installation in the left pane and then the top item,
New SQL Server stand-alone installation or add features to an existing
installation in the right pane.
- To proceed through the installation, just
agree with everything (click OK, Next, Install) until you get to the
Feature Selection dialog. Along the way, you may see
dialogs labeled Setup Support Rules that evaluates your system
for compatibility with the SQL Server.
If any of the tests fail, you need to correct the issue and start over.
You may get a firewall warning, note that to set up your SQL Server for
remote access, you must allow remote users access to your Server on port
1433. You must also allow remote users access to your server on port 1434
if you are using SQL Authentication.
- On the Feature Selection dialog, Feature Selection
Pane: Select only Management Tools - Basic and click Next.
- Then just continue clicking OK, Next, Install until it completes.
- Back to the LoadmanSoftware.com Release page get and run the file
SQL_Server_2008xXX (where XX is 32 or 64 depending
whether you need the 32 or 64 bit SQL Server).
- You will be presented with the SQL Server Installation Center.
Select Installation in the left pane and then the top item,
New SQL Server stand-alone installation or add features to an existing
installation in the right pane.
- Then continue to agree with everything (click OK, Next, Install)
until you get to the Feature Selection dialog.
Along the way, you will see one or more dialogs labeled
Setup Support Rules that evaluate your system.
If any of the tests fail, you need to correct the issue and start over.
- Then continue through the setup taking defaults except as noted ...
- Feature Selection Pane: Select only Database Engine Services.
- Instance Configuration Pane: Select Named instance with
the Name and Instance ID both set to SQLExpress.
- Server Configuration Pane: Enter an Admin account and password for the
SQL Server Database Engine. This should usually be the current user.
- Database Engine Configuration Pane: Select Windows authentication mode and
add an administrator (click Add Current User).
SQL Server Express 2012 Install
- Log on to your computer with an Admin account.
- From the LoadmanSoftware.com Release page get and run the file
SQL_ManagementStudio_xXX_ENU.EXE (where XX is 86 or 64 depending
whether you need the 32 or 64 bit SQL Server).
- You will be presented with the SQL Server Installation Center.
Select Installation in the left pane and then the top item,
New SQL Server stand-alone installation or add features to an existing
installation in the right pane.
- To proceed through the installation, just
agree with everything (click OK, Next, Install) until you get to the
Feature Selection dialog. Along the way, you may see
dialogs labeled Setup Support Rules that evaluates your system
for compatibility with the SQL Server.
If any of the tests fail, you need to correct the issue and start over.
You may get a firewall warning, note that to set up your SQL Server for
remote access, you must allow remote users access to your Server on port
1433. You must also allow remote users access to your server on port 1434
if you are using SQL Authentication.
- On the Feature Selection dialog, Feature Selection
Pane: Select only Management Tools - Basic and click Next.
- Then just continue clicking OK, Next, Install until it completes.
- Back to the LoadmanSoftware.com Release page get and run the file
SQLEXPR_xXX_ENU.exe (where XX is 86 or 64 depending
whether you need the 32 or 64 bit SQL Server).
- You will be presented with the SQL Server Installation Center.
Select Installation in the left pane and then the top item,
New SQL Server stand-alone installation or add features to an existing
installation in the right pane.
- Then continue to agree with everything (click OK, Next, Install)
until you get to the Feature Selection dialog.
Along the way, you will see one or more dialogs labeled
Setup Support Rules that evaluate your system.
If any of the tests fail, you need to correct the issue and start over.
- Then continue through the setup taking defaults except as noted ...
- Feature Selection Pane: Select only Database Engine Services.
- Instance Configuration Pane: Select Named instance with
the Name and Instance ID both set to SQLExpress.
- Server Configuration Pane: Enter an Admin account and password for the
SQL Server Database Engine. This should usually be the current user.
- Database Engine Configuration Pane: Select Windows authentication mode and
add an administrator (click Add Current User).
Configuring the SQL Server
- From the Start Menu, find and run the
SQL Server Management Studio.
- It will start with a Connect to Server screen showing.
The Server Name combo box should show
<server name>\SQLEXPRESS
where server name is either the network name of the computer or just a
dot (.), if not, please enter it.
The Authentication combo box should show Windows Authentication.
Insert the User name and Password that you selected during the
install.
Press the Connect button.
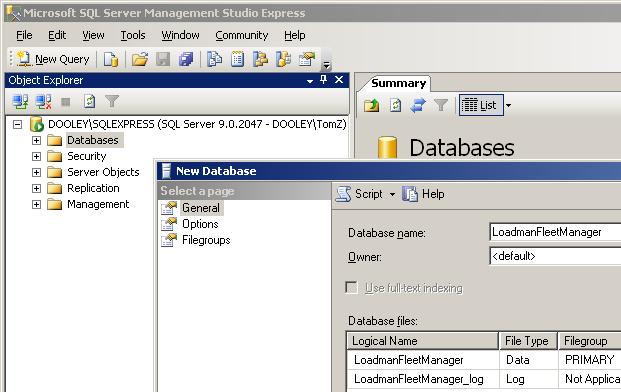
- As per the following screen shot, from the Object Explorer pane on the left, right-click
Databases and select New Database. Set the Database Name
(at the top of the dialog box) to LoadmanFleetManager. The
rest of the defaults are OK unless you have a desire to store the
database files elsewhere. Then click OK.
- Close the SQL Server Management Studio.
- If you want the database to only be accessible from the computer which
it is installed on, you are done. Continue with the following to
allow access to the database from other computers.
- From the Start Menu, find and run, from the
SQL Configuration Tools sub-group,
the SQL Server Configuration Manager.
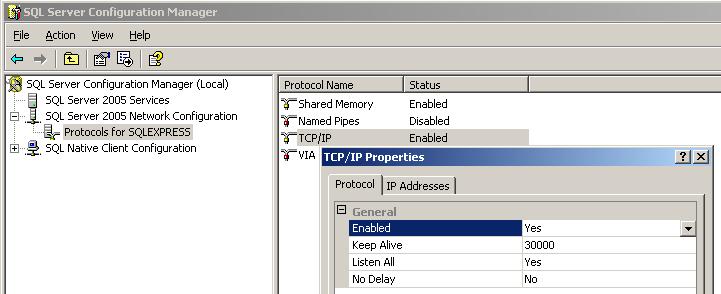
- In the tree control at the left,
expand the item SQL Server 2005 Network Configuration
(If it has a '+' to the left, click it, if it has a '-' it is already expanded).
- Click Protocols for SQLEXPRESS.
- Then on the right pane right-click TCP/IP and select Properties.
This will bring up a dialog box.
Set all entries as per the following screen shot.
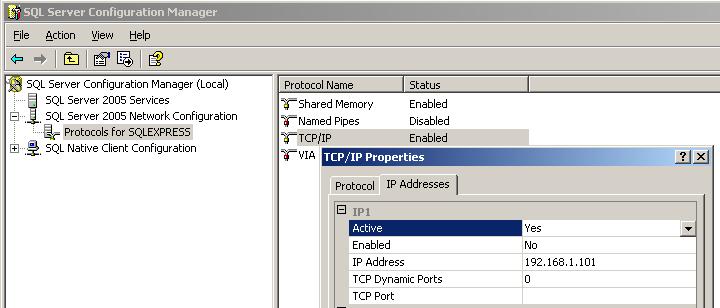
- Now select the IP Address tab and set the values for IP1 as per the
following screen shot. Note that the IP address shown will probably
not be the same as yours. This is OK, do not change it.
Note for SQL 2008 users, you may have to scroll down to find the IP4 (old style) address of your
computer, and it is probably already set up correctly.
Advanced users: If you have a server with multiple NICs, edit the entry for the IP that you
will be using for the database connection.
Then click OK.
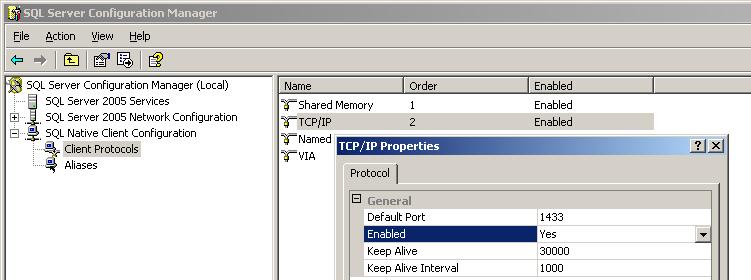
- In a similar fashion, expand the item SQL Native Client Configuration
in the tree on the left,
click Client Protocols, right-click TCP/IP in the right pane,
and select Properties.
Set the values as shown in the following screen shot. Then click OK.
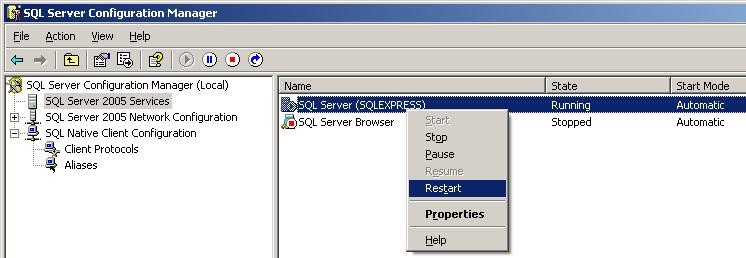
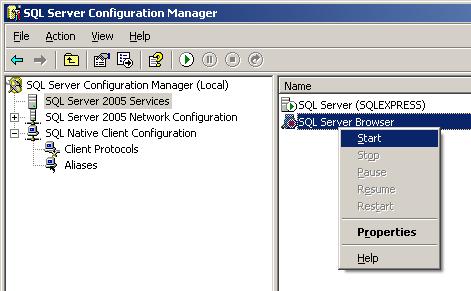
- Click SQL Server 2005 Services. Then in the right pane right-click
SQL Server (SQLEXPRESS) and restart it as per the following screen shot.
- In the right pane, right-click SQL Server Browser, select
Properties, and then select the Service tab. Then set the
Start Mode to Automatic as shown the following screen shot.
Then click OK.
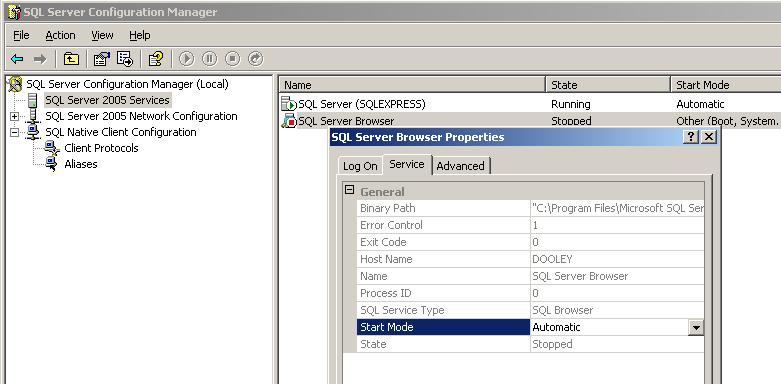
- Then right-click again on SQL Server Browser and select start as
shown in the following screen shot.
Your computer now has the Microsoft SQL Server Express installed and configured.
If you intend to access your SQL Server from another computer please make sure
that your firewall, router, etc are configured to allow remote access. Hint, the
default port used by the SQL Server is 1433.