Microsoft SQL Server Connection and Security
There are many options for connecting to an SQL Server and many ways to
configure security.
We recommend that you keep things simple by using the most
flexible interconnect, TCP/IP, and follow
Microsoft's prefered security solution, Windows Authentication.
Some users feel there is also a need to use SQL Server based Authentication,
so it is also included in this turorial.
However, as noted below, the Loadman Fleet Manager gives you the ability to
choose any connection/security method that the SQL Server supports. But those
other methods are not documented here. See SQL Server documentation.
Connection Strings
A connection string is instructions to the SQL Server Client software providing
instructions on how to connect to the database.
There are two places in the Loadman Fleet Manager user interface where you are
asked to enter SQL Server connection strings. They are the the
Database Connection tab in the Mainteneance Tools
and in the setup for realtime data export.
Simplified Connection Strings
The Loadman Fleet Manager supports a simplified connection string format
where the user is only required to enter as little as one item and the rest
of the (sometimes complex) string is automagically generated.
The format of the data that you are asked to provide
is the three values server\instance;database which are ...
- server: is the TCP/IP address and optionally the port. This can be a
computer name that can be resolved on your network such as OurSqlServer,
a numeric IP address such as 192.168.1.101, or localhost if
the SQL Server is on the same computer as the Loadman Fleet Manager. One may
also specify a port number after the IP address such as 24.16.92.7,1433,
the port number is required if you choose to not have the browser service
running on your sql server or have configured a non-default port.
- \instance: is optional when using Windows Authentication and required
when using SQL Server Authentication. It is used to specify the
SQL Server instance name. If not provided the name is set to the default
of SQLEXPRESS. When using SQL Server Authentication set it to your instance
name which is SQLEXPRESS unless you have a non-standard installation.
- ;database: is optional and allows you to have the database named something
other than the default of LoadmanFleetManager. I have no idea why you would
want to do this, I put it in so that I could easily switch databases
while testing.
If you have a standard installation and all of your computers are in the same
Domain or Workgroup, the connection string for the Master is localhost
and the connection string for Satellites are SQLServerComputerName.
These fields are then processed used to generate the
connection string as follows...
Provider=SQLNCLI;Data Source=server\instance;Integrated
Security=SSPI;DataTypeCompatibility=80;Initial Catalog=database;
Custom Connection Strings
To allow flexibility, if the connection string starts with a ! it will
not be processed by the Loadman Fleet Manager before sending it to the SQL Server.
That is, the connection string following the ! is sent unaltered.
So one could connect to a database named LFM_Data on the machine
OurServer by entering the connection string ...
!Provider=SQLNCLI;Data Source=OurServer;Integrated Security=SSPI;DataTypeCompatibility=80;Initial Catalog=LFM_Data;
Note that the fields Provider=SQLNCLI and DataTypeCompatibility=80 are
required by the Loadman Fleet Manager.
Security and Permissions
There are two methods for providing security for the SQL Server. The first,
Windows Authentication, is recommended for most users. SQL Server
Authentication is documented for those whose network configuration requires it.
Windows Authentication
Windows authentication means that the remote database user must be
authenticated (as a valid Windows user) on the computer hosting the SQL Server.
If you have a domain based network, this is accomplished with the domain
configuration tools, your domain admistrator will need to make these settings.
If not on a domain (such as set up to use a Workgroup), then one can still
use windows authentication
by creating a mirror of the remote user's account on the server.
This means that you
need to create a user account on the server with the same username and password
as the remote user.
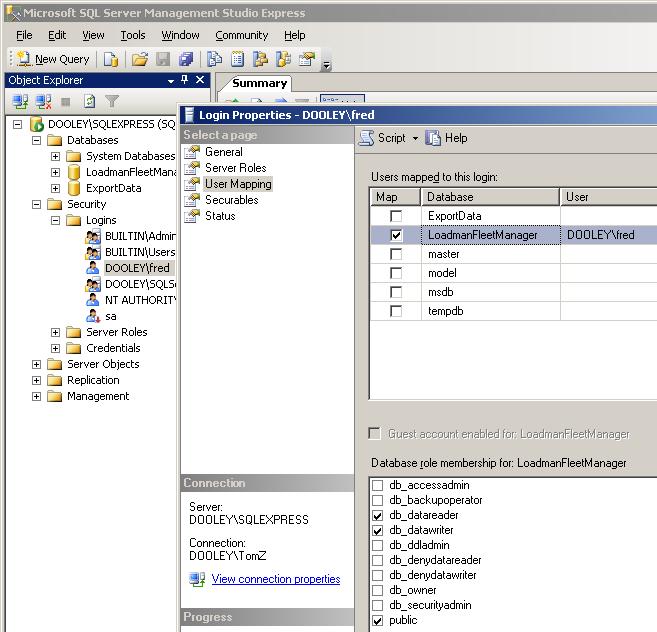
For a user to access the SQL Server, they must either have administrator
privledges on the server computer or the SQL Server needs to be configured to
allow their connection. To configure a user, do the
following using the SQL Server Management Studio. From the
left pane at the server (or instance) level select Security:Logins
and add the user in the form of Computer\User
Then in the right pane right click the user and select
properties. From the left pane of the property window select User Mapping
and then check the database that you are granting access to. In the database
roles below, check db_datareader, db_datawriter and
public as shown below.
SQL Server Authentication
First you need to configure the SQL Server to support SQL Server
Authentication follow. Using the SQL Server Management Studio right click
the top entry in the Object Explorer tree and select properties then select
security from the list on the left. Select
SQL Server and Windows Authentication mode as shown.

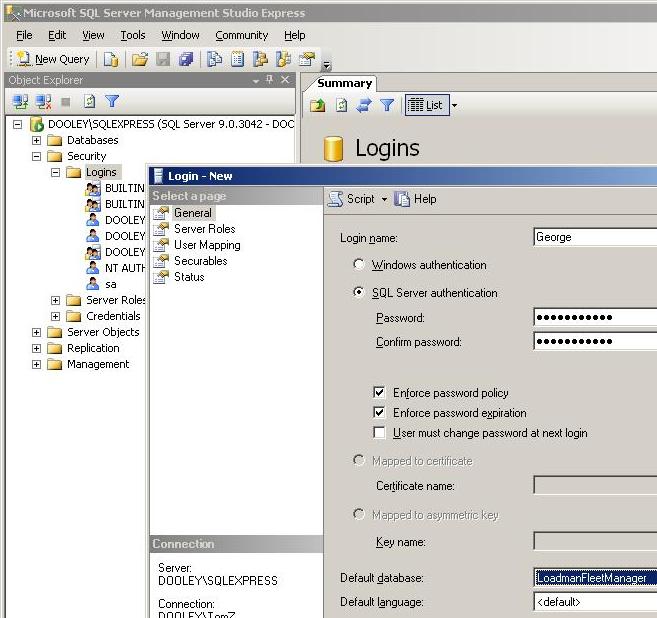
To add a user,
expand the Object Explorer tree as shown below and right click on
Logins and select New Login. Enter the user's name, select
SQL Server Authentication, and set the password.
Then select LoadmanFleetManager as the default database.
Note that the option
User must change password at next login is not supported by the
SQL Server Express and thus must not be selected.
The user must be given permission to access the database. Right click on the
new user, select properties, and then select User Mapping.
Select the database "LoadmanFleetManager". Then enable db_datareader,
db_datawrite, and public as shown.
The user that will be used for the Master Computer connection must also
be given db_ddladmin and db_backupoperator that is shown in red.
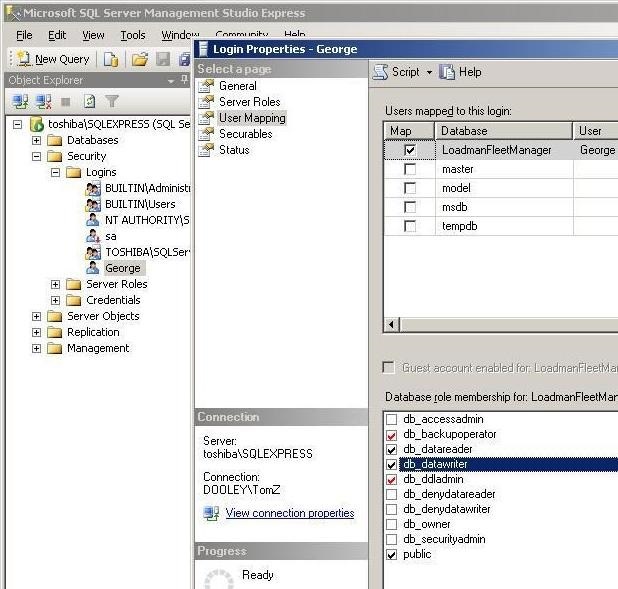
Now restart the SQL Server. Select the top entry in the Object Explorer tree,
right click, and select Restart.
The connection string for the user thus created is
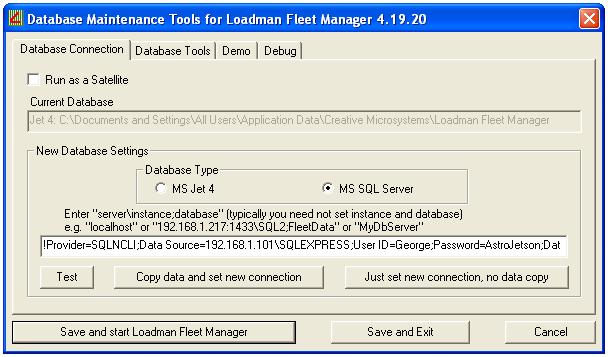
!Provider=SQLNCLI;Data Source=TheServer\SQLEXPRESS;User ID=George;Password=AstroJetson;DataTypeCompatibility=80;Initial Catalog=database;
Populating the SQL Database before first use
Before using the SQL database, tables must be created and then populated with
your current data (or for new users, the basic default values). This is
accomplished from the maintenance tools view as seen below. The steps to
accomplish this are ...
- Make sure that the "Current Database" is set to your "Jet 4" database.
If it is not...
- select the "Database Type" of "MS Jet 4"
- press "Save and Exit"
- restart the "Maintenance Tools"
- Make sure that the SQL connection string works by pressing "Test".
- Press "Copy data and set new connection".
- Press "Save and start Loadman Fleet Manager".
- When the Loadman Fleet Manager starts, select menu items
"Help" : "Folders" and right above the "Close" button you will see your
database connection type, it will say "SQL Server ...."